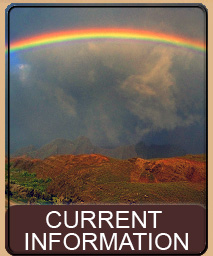
Introduction
The iridescent Fissure and Ice Cream Cone Walk takes you over a very large flat area of lava. Nearby are extremely long and deep fissures that once fountained lava hundreds of feet into the air. The falling molten lava coated everything around with a beautiful drippy bright metallic and iridescent colored shell. Bright colors and unusual shapes are everywhere. If you know someone who is a seen one rock you've seen 'em all type of person, take them on this walk as no two rocks are the same. This is a very easy hike and you can make this as long or short as you desire. This is also one of the best examples of the varied nature of lava on the island.
Getting There

This hike starts out at the same place as our Pu'u Huluhulu and Mauna Ulu trail. To get there take Highway 11 to Volcano and enter the Hawai'i Volcanoes National Park. Once you pass the park gatehouse make the first left onto Crater Rim Drive. Continue on Crater Rim Drive 3 miles until the intersection with Chain of Craters Road. Turn left onto Chain of Craters Road and proceed approximately 3.6 miles to the left hand turn for Mauna Ulu. This road dead-ends at the Mauna Ulu parking lot. Park and proceed to the dead end (end of the pavement).
Walk past the trailhead on the left that goes to Pu'u Huluhulu and continue to the very end of the paved roadway.

Now that you're at the end of the pavement, directly in front of you is an a'a lava flow (very jagged rock wall of lava). To get to the start of our walk skirt the a'a flow to the right. As you walk around the a'a flow, about 40 feet or so, you will see a ridge line. Just about at the point where the ridge intersects the a'a flow is where we want to go. So walk to the ridge about 20 feet or so from the a'a flow - near the ridge you will see that it is a bit worn as that is the way most people take.
Once you're on top of the ridge you will be able to look down and see that there is a fissure and then a very flat expanse of small lava pieces and some large and unusual shaped lava rocks. Walk down the ridge and cross the fissure.
Click here to view a map
General Information
This is an easy walk over very flat, through rocky ground. The more adventurous will find many ridges to scramble around with interesting things to see, but in general this is a simple, though extremely interesting walk.
We generally do this walk in rubbah slippahs but you might want to wear sneakers, as you will be walking over lots of small pieces of loose lava. We recommend sunscreen and a hat and water, as there is no shade on this walk. And a camera is, of course, a must.
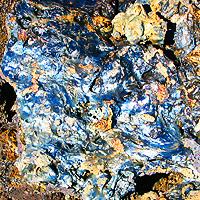
Since one of the major features of this walk is the bright metallic colors of the rocks, the brighter and clearer the weather the better the viewing will be.
We have allocated two to three hours - but actually you can spend as much time as you want, anywhere from 20 minutes to hours. Since you are also right near the Pu'u Huluhulu and Mauna Ulu trail, you might think about incorporating those hikes along with this walk!
Things To Be Careful Of
The following are general cautions and warnings for this trail:
This is a fairly flat and easy trail. However, there are a number of very deep fissures that you need to cross as well as lava tube entrances and other deep holes in the ground. Keep an eye on where you are walking and if you bring children, keep them close at all times. (We will note that we have seen local school classes on this walk, so it is definitely kid-friendly.)

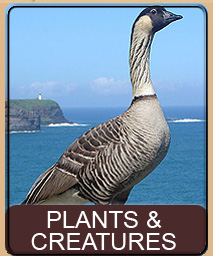
You might see the endangered Hawaiian Nēnē Goose around this area. Keep in mind that these birds are protected and it is a state and federal offense to harass, touch or feed these birds.
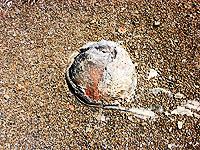
Be careful of the fragile ground on this walk. There are excellent examples of pumice lava near the Ice Cream Cone that if stepped on, will be destroyed forever.
What You Will See
Ok, assuming that you are standing at the top of the ridge as per our Getting There instructions, you will be looking down at a long, but not too wide, fissure. Scramble down the ridge and cross the fissure. You are now on a large and fairly level area. The lava here is made up of small rocks about the size of a marble and you will see huge rocks a short distance in front of you. To your right will be the fissure and the ridge.

Before we start let's learn a brief history about the area where we will be walking. For those of you who have done our Pu'u Huluhulu and Mauna Ulu walk you will recall that in May of 1969 through July of 1974 Mauna Ulu sent huge quantities of lava flowing in all directions. On November 10, 1973 earthquakes rocked this area and a 1.5 mile long series of fissures opened between Mauna Ulu to Pauahi Crater and lava plumed from the fissures up to 200 feet in the air. These fissures are what you are now looking at, and this walk will basically take you alongside the line of fissures. The ridge you just crossed is upwind of the fissures and thus was built up from the majority of the lava falling there. The rock you are walking on is also from the fountains of lava that streamed from these fissures. You can imagine that anything growing in the area at the time would have been met with a rainstorm of molten rock.
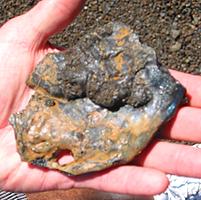
Take a moment to examine the lava you are walking on. It is composed of small pieces of rock, all fairly uniform in size but varying in color. Occasionally you will encounter other smooth blob-ish areas of lava. The colors on much of the lava are bright and bold and border on being metallic as well as iridescent. This is due in part to the glassy nature of the rock as well as the fact that this fountained hundreds of feet into the air and rained down as small pieces cooled as they tumbled to the ground.

As you walk towards the unusual rock formations keep an eye on the changing colors of the ground around you. You will also want to occasionally cross the fissure and check out the ridge. Due to the direction of the wind the ridge was where most of the falling lava ended up. Much of the ridge is very smooth and red to brown with breakouts of extremely glassy and colorful rock. Holes can be found piercing parts of the ridge that have drips of lava. The ridge is very coated looking and is very different from most lava. If you peer over the ridge you will discover that the ground is actually higher on the other side. This might be an indication that the ground near the fissure actually sank (subsided) from the surrounding area (or another possibility is that the area over the ridge filled in with a more recent lava flow but the ridge itself kept the lava flow from entering).

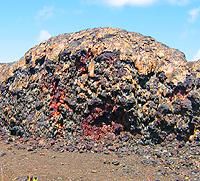
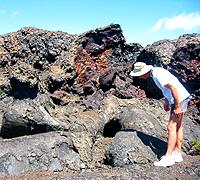
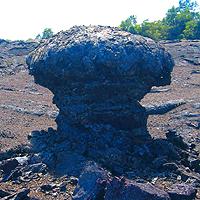
The rock formations you see in the middle of this expanse are lava trees. Where these formations now stand was once a huge 'Ōhi'a Lehua forest. While most of the trees were burnt to the ground in the lava flows and fountains of lava, a few trees were coated in lava before being burnt, leaving these wonderful lava capped formations. While there are many great examples of lava trees throughout the Big Island, these tress are unique in the more organic and even vegetable shapes they tended to take on. The lava tree pictured here is most unique and you will easily find this tree at the start of your walk. Take a moment to examine this tree from all angles (and no, this is not Ice Cream Cone). As you walk around this tree you will see that it is extremely colorful and varied in the tones and metallic textures. The tree is fairly symmetrical, as are most of the trees in this area, due to the closeness to the fissures. As the fissures fountained lava these trees were almost directly below the fallout causing the lava to fall evenly and create the mushroom style cap.

As you check out the formations in this first area, continue walking along the fissure and ridge. The fissure comes and goes and varies in depth from a few feet to undeterminable depths. Try to avoid the desire to scramble down into the fissures because this is not somewhere you would want to be if an earthquake struck.
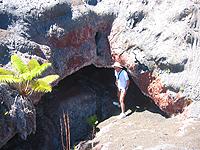
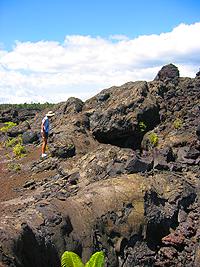
As you are beginning to find out, there is no real trail here. So, to a degree, you don't need to follow our directions to the letter. There are many things to see and explore in the area and we do not nearly cover them all in this article. The basic idea is to follow the ridgeline and fissure while exploring the nearby areas. As you continue to walk you will see in front of you that the ridge is split in the middle with a very walkable pathway through it, and another huge flat expanse on the other side. Go through this split and onto the new expanse. In the picture to the right here you can see tiny little John beyond the split in the fissures.
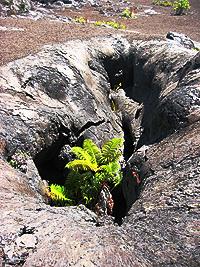
You are now in part two of this walk. You can think of the last part as kind of the warm-up session. The real fun lies in the area we are now entering. This area must have seen much more dramatic fountaining activity than the last area. The fissure grows more dramatic and includes huge holes and deep tunnels. You need to be much more careful in this area as the ground is more fragile. Especially near the fissure and ridge the ground exhibits occasional small holes that could easily become larger ones if one were to accidentally step near them. Also, in the flat area away from the fissure you can find pumice lava, which is extremely small and fragile.

Continue along the fissure and ridge. The fissure continues to become larger with huge holes in places and the ridge continues to build into more and more impressive shapes, often with holes in the sides where lava must have fountained to great heights. As you continue along, inspecting the area, you will begin to see in the distance the Ice Cream Cone formation.
Ice Cream Cone is a large lava tree that got its name because from certain angles it greatly resembles a classic one-dip ice cream cone. The angle you are approaching it is not the most optimal view of the effect, but it's close, so you will be able to pick it out as you follow the fissure.
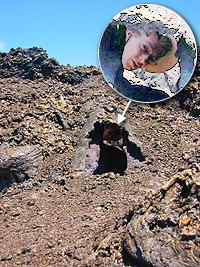
When you reach Ice Cream Cone, take a good walk around it because the shape varies greatly. I personally find that it stands out as an ice cream cone most when viewing with the ridge behind it. The three pictures below of the Ice Cream Cone are from three angles but unfortunately the lighting is awful in two of them.
After you are finished go to the ridge nearby, as there are some very impressive holes and formations in that area.
When you are on the ridge behind Ice Cream Cone, and look back at Ice Cream Cone, you will note that a distance behind it is another lava tree that looks almost like another ice cream cone, or more accuratly perhaps a perfect mushroom. Head over to it and check it out. Mushroom rock only looks like a mushroom from the direction you are going.
Now, while your at the mushroom rock, we are going to start to head back the way we came, but instead of going along the fissure, head parallel to it from the mushroom rock. Be very careful in this area. You will find lava tree formations with wood still attached or nearby - a reminder to the fact that this ground is only about 30 years old. You will also find the pumice lava we were talking about. Walk very carefully. The pumice is very small - patches the size of a dime all the way up to fist sized pieces. It sits on top of the ground, though is attached in most cases, and is very open and airy looking and honeycombed with small bubbles and chambers. This lava floats in water because it traps so much air in it's complex structure. The amazing thing is that this lava exists at all after 30 years. It is extremely fragile and crushes under the slightest of pressure. How it holds up to rain and the forces of nature is amazing. The piece you see here was loose on the ground and when we picked it up, it had almost no weight at all.
Head back the way you can, but amble around the area (being careful). You will find many more lava trees and other interesting features, as you head back to your car.